LAMPの「P」「M」をインストールしていきます。
- インストール状況の確認
- インストール済みの場合には、旧バージョンのアンインストール
- PHPモジュールのリセット
- インストールパッケージを有効
PHP のインストールと設定
インストール状況の確認
# php --version
bash: php: command not found...
立ち上げ中の環境には、インストールされていません。
試しに稼働中のサーバーで確認すると、PHP7.4が確認できます
# php --version
PHP 7.4.30 (cli) (built: Jun  7 2022 08:38:19) ( NTS )
Copyright (c) The PHP Group
Zend Engine v3.4.0, Copyright (c) Zend Technologies
インストール済みのPHPがあれば削除
もしPHPインストールパッケージが確認されたら「dnf remove 」で削除します
# dnf list installed | grep php
・
# dnf remove php*
# dnf remove php-*
再度、「php: command not found…」で削除された事を確認します。
PHP8.2のインストール
現在、PHP8.1、PHP8.2が推奨されているみたいなので、PHP8.2をインストールしようと思います。
PHP モジュールリストを確認
# dnf module list php
Rocky Linux 9 - AppStream
Name       Stream         Profiles                         Summary
php        8.1            common [d], devel, minimal       PHP scripting language

Remi's Modular repository for Enterprise Linux 9 - x86_64
Name       Stream         Profiles                         Summary
php        remi-7.4       common [d], devel, minimal       PHP scripting language
php        remi-8.0       common [d], devel, minimal       PHP scripting language
php        remi-8.1       common [d], devel, minimal       PHP scripting language
php        remi-8.2       common [d], devel, minimal       PHP scripting language
php        remi-8.3       common [d], devel, minimal       PHP scripting language
モジュールを初期状態にし、remi-8.2 モジュールのインストール
# dnf module install php:remi-8.2
======================================================================================
 パッケージ         Arch        バージョン                 リポジトリー      サイズ
======================================================================================
group/moduleパッケージをインストール:
 php-cli            x86_64      8.2.13-1.el9.remi          remi-modular      5.4 M
 php-common         x86_64      8.2.13-1.el9.remi          remi-modular      844 k
 php-fpm            x86_64      8.2.13-1.el9.remi          remi-modular      1.8 M
 php-mbstring       x86_64      8.2.13-1.el9.remi          remi-modular      574 k
 php-xml            x86_64      8.2.13-1.el9.remi          remi-modular      213 k
依存関係のインストール:
 oniguruma5php      x86_64      6.9.9-1.el9.remi           remi-safe         219 k
弱い依存関係のインストール:
 nginx-filesystem   noarch      1:1.20.1-14.el9_2.1        appstream         8.5 k
モジュールプロファイルのインストール中:
 php/common
モジュールストリームの有効化中:
 php                            remi-8.2
# dnf install php
===================================================================================
パッケージ Arch バージョン リポジトリー サイズ
===================================================================================
インストール:
php x86_64 8.2.13-1.el9.remi remi-modular 1.8 M
依存関係のインストール:
libsodium x86_64 1.0.18-8.el9 epel 161 k
弱い依存関係のインストール:
php-opcache x86_64 8.2.13-1.el9.remi remi-modular 606 k
php-pdo x86_64 8.2.13-1.el9.remi remi-modular 117 k
php-sodium x86_64 8.2.13-1.el9.remi remi-modular 62 k
トランザクションの概要
===================================================================================
インストール済み:
libsodium-1.0.18-8.el9.x86_64 php-8.2.13-1.el9.remi.x86_64
php-opcache-8.2.13-1.el9.remi.x86_64 php-pdo-8.2.13-1.el9.remi.x86_64
php-sodium-8.2.13-1.el9.remi.x86_64
WordPress 推奨、拡張モジュールのインストール
WordPressを動作させるのに、必要または有効なPHP拡張機能があります。
こちらを参考にして、インストールしておきたいと思います。
標準のPHPのインストールですでにインストール済みになっているモジュールもありますが
とりあえず「dnf install 」を実行してみます。
 # dnf install php-curl
パッケージ php-common-8.2.13-1.el9.remi.x86_64 は既にインストールされています。
依存関係が解決しました。
行うべきことはありません。
完了しました!
インストールされていれば、インストール済みのメッセージを出してくれます。
# dnf install php-curl
# dnf install php-dom
# dnf install php-exif
# dnf install php-fileinfo
# dnf install php-hash
# dnf install php-mbstring
# dnf install php-openssl
# dnf install php-pcre
# dnf install php-xml
# dnf install php-opcache
# dnf install php-iconv
# dnf install php-ftp
# dnf install php-sockets
# dnf install php-filter
行うべきことはありません。


# dnf install php-igbinary
# dnf install php-imagick
# dnf install php-intl
# dnf install php-zip
# dnf install php-redis
# dnf install php-shmop
# dnf install php-ssh2
インストール

# dnf install php-bc
# dnf install php-image
エラー: 一致するものが見つかりません
https://make.wordpress.org/hosting/handbook/server-environment/#php-extensions
WordPresのサイトを参考に、PHP拡張機能をインストールしてみました。
かなり、デフォルトでインストールされていました。
追加インストールしたのは、7個で、2個はパッケージが見当たりませんでした。
とりあえず、この状態で進めます。
php.ini の設定
PHPの設定は、「/etc/php.ini」で行います。
設定の詳細や例は、ちょっと古いですが、こちらのサイトを参考にさせていただきました。
https://www.rem-system.com/centos8-php-install/
https://www.xserver.ne.jp/manual/man_server_phpini_setting_item.php
https://qiita.com/knife0125/items/0e1af52255e9879f9332
まずは、バックアップをとり、編集後、「php-fpm」と「httpd」を再起動します。
# cp -p /etc/php.ini /etc/php.ini.org
# vi /etc/php.ini

; expose_php = On
expose_php = Off

;post_max_size = 8M
post_max_size = 128M

;upload_max_filesize = 2M
upload_max_filesize = 128M

;date.timezone =
date.timezone = "Asia/Tokyo"

;mbstring.language = Japanese
mbstring.language = Japanese

;mbstring.internal_encoding =
mbstring.internal_encoding = UTF-8

;mbstring.http_input =
mbstring.http_input = UTF-8

;mbstring.http_output =
mbstring.http_output = pass

;mbstring.encoding_translation = Off
mbstring.encoding_translation = On

;mbstring.detect_order = auto
mbstring.detect_order = auto

;mbstring.substitute_character = none
mbstring.substitute_character = none

# systemctl restart php-fpm
# systemctl restart httpd
Webブラウザで確認
PHP設定の情報を出力させるコマンド「phpinfo()」を実行できるページを作成し
Webブラウザに表示させます。
ここでは「/home/www/home」に「index.php」という、ファイルを作成します
# cd /home/www/html
# echo '<?php phpinfo(); ?>' > index.php
「index.php」ファイルが作成されたら、Webブラウザのアドレスバーからアクセスできます
https://www.hogehoge.com/index.php
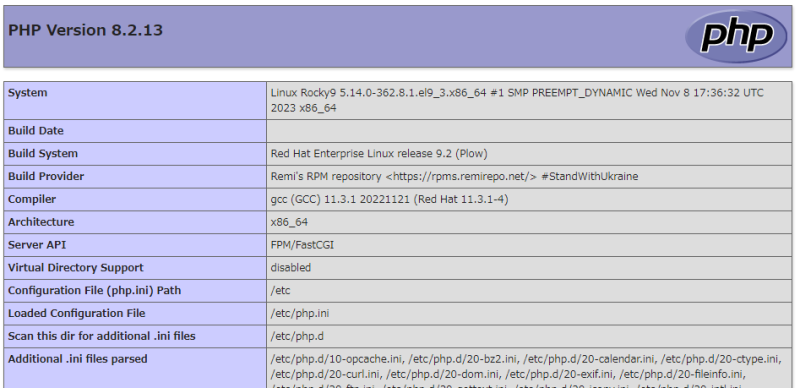
「index.php」は、確認が終了したら、必ず削除しましょう。
MariaDBのインストールと設定
RockyLinux9 には、デフォルトリポジトリで、MariaDB 10.5 が提供されています。
最新ではないですが、このバージョンであれば簡単にインストールできます。
パッケージの確認とインストール
# dnf list mariadb*
mariadb.x86_64                    3:10.5.22-1.el9_2     appstream・
mariadb-server.x86_64             3:10.5.22-1.el9_2     appstream・
mariadb-devel.x86_64              3:10.5.22-1.el9_2     crb
・
・
# dnf install mariadb-server
・
・
# dnf list installed | grep mariadb
mariadb.x86_64                     3:10.5.22-1.el9_2     @appstream
mariadb-backup.x86_64              3:10.5.22-1.el9_2     @appstream
mariadb-common.x86_64              3:10.5.22-1.el9_2     @appstream
mariadb-connector-c.x86_64         3.2.6-1.el9_0         @appstream
mariadb-connector-c-config.noarch  3.2.6-1.el9_0         @appstream
mariadb-errmsg.x86_64              3:10.5.22-1.el9_2     @appstream
mariadb-gssapi-server.x86_64       3:10.5.22-1.el9_2     @appstream
mariadb-server.x86_64              3:10.5.22-1.el9_2     @appstream
mariadb-server-utils.x86_64        3:10.5.22-1.el9_2     @appstream
起動と確認と自動起動設定
# systemctl start mariadb.service
# systemctl status mariadb.service
・
・
# systemctl enable mariadb
・
・
#  systemctl is-enabled mariadb
enabled
基本的なセキュリティ設定
「mysql_secure_installation」を実行します。
デフォルトで「unix_socket」が有効になっているようで、以前と少し変わっています。
こちらのサイトを参考にさせていただいて、設定しました。
# mysql_secure_installation
・
Enter current password for root (enter for none): <-- パスワード入力だけど
OK, successfully used password, moving on...           設定していない場合は「Enter」
・
・
Switch to unix_socket authentication [Y/n] n <--- 「unix_socket」認証に切り替えるか?
・
・
Change the root password? [Y/n] Y <---- MariaDBのrootユーザに変更するか
・
New password:               <---- パスワード入力
Re-enter new password:      <---- パスワード入力
Password updated successfully!
・
・
By default, a MariaDB installation has an anonymous user, allowing anyone
Remove anonymous users? [Y/n] Y     <----- ログインできる匿名ユーザーを削除するか?
 ... Success!
・
Disallow root login remotely? [Y/n] Y  <-- リモートからのrootログイン不許可?
 ... Success!
・
Remove test database and access to it? [Y/n] Y  <-- 「test」データベースの削除?
・
 ... Success!
・
Reload privilege tables now? [Y/n] Y  <---- 設定した特権テーブルを反映させるか?
 ... Success!
・
・
Thanks for using MariaDB!
文字コードの設定
文字化け発生の可能性があるとの事で、文字コードを変更
設定ファイルは「/etc/my.cnf.d/mariadb-server.cnf」で行うので
バックアップアップを取って、編集。
保存が完了したら、再起動、起動確認します。
# cp -p /etc/my.cnf.d/mariadb-server.cnf /etc/my.cnf.d/mariadb-server.cnf.org
# vi /etc/my.cnf.d/mariadb-server.cnf
・
[mariadb]
## ---- added on 12/9
character-set-server = utf8mb4

## ---- added on 12/9
[client-mariadb]
default-character-set = utf8mb4
・
・
# systemctl start mariadb
# systemctl status mariadb
文字コード確認
$  mysql -u root -p  <---- MariaDBに接続

Enter password:    <---- パスワード入力
Welcome to the MariaDB monitor.  Commands end with ; or \g.
Your MariaDB connection id is 6
Server version: 10.5.22-MariaDB MariaDB Server

Copyright (c) 2000, 2018, Oracle, MariaDB Corporation Ab and others.

Type 'help;' or '\h' for help. Type '\c' to clear the current input statement.

MariaDB [(none)]> show variables like "chara%";
+--------------------------+------------------------------+
| Variable_name            | Value                        |
+--------------------------+------------------------------+
| character_set_client     | utf8mb4                      |
| character_set_connection | utf8mb4                      |
| character_set_database   | utf8mb4                      |
| character_set_filesystem | binary                       |
| character_set_results    | utf8mb4                      |
| character_set_server     | utf8mb4                      |
| character_set_system     | utf8                         |
| character_sets_dir       | /usr/share/mariadb/charsets/ |
+--------------------------+------------------------------+
8 rows in set (0.001 sec)

MariaDB [(none)]> quit   <---- MariaDBから接続解除
Bye
show variables like “chara% ;コマンドで、「utf8mb4」になっていればOK
です。
筆者の環境では、最初「character_set_database」と「character_set_server」が
「latin1」になっていました。
いろいろ悩みましたが、一度再起動したところ、正常になりました。
接続解除は「quit」を入力します。
