ファイヤーウォール設定の確認
ここでのファイヤーウォールは、「firewalld」を使用しています。
今までの設定を確認してみます。
$ firewall-cmd --get-active-zones
admin
  sources: 192.168.0.0/24
public (default)
  interfaces: wlp8s0

$ sudo firewall-cmd --list-all --zone=public | grep services
  services: dhcpv6-client http https
$ sudo firewall-cmd --list-all --zone=admin | grep services
  services: dhcpv6-client http https ssh
「https」の許可は完了しています。
sslモジュールを有効化
「ubuntu」では、有効なモジュールは「/etc/apache2/mods-enabled/」にシンボリックリンクとしてファイルが存在すれば、有効になっています。
私の環境では、有効になっていないようですので、「a2enmod ssl」で有効にします。
$ sudo a2enmod ssl
Considering dependency mime for ssl:
Module mime already enabled
Considering dependency socache_shmcb for ssl:
Enabling module socache_shmcb.
Enabling module ssl.
See /usr/share/doc/apache2/README.Debian.gz on how to configure SSL and create self-signed certificates.
To activate the new configuration, you need to run:
  systemctl restart apache2

$ sudo systemctl restart apache2
Certbot クライアントのインストールと証明書取得
Let’s Encrypt から証明書を取得するには、「Certbot」を利用するので、パッケージを確認してみます。
$ apt list | grep certbot
WARNING: apt does not have a stable CLI interface. Use with caution in scripts.

certbot/noble 2.9.0-1 all
  ・
  ・
python3-certbot-apache/noble 2.9.0-1 all
  ・
  ・
パッケージの確認ができたので、インストールします
$ sudo apt update
$ sudo apt upgrade
$ sudo apt install certbot
$ sudo apt install python3-certbot-apache
インストールが完了したら、証明書をゲットします。
コマンドオプションは「certonly」「–webroot」で取得できますが、
対象のサーバでWebサーバーが動作しており、外部から80番ポートへアクセスできる必要があります。
$ sudo certbot certonly --webroot -w /home/www/html/ -d www.hogehoge.com -d hogehoge.com
Saving debug log to /var/log/letsencrypt/letsencrypt.log
Enter email address (used for urgent renewal and security notices)
 (Enter 'c' to cancel): hoge@hogehoge.com <------自分のEメールアドレスを入力

- - - - - - - - - - - - - - - - - - - - - - - - - - - - - - - - - - - - - - - -
Please read the Terms of Service at
https:// letsencrypt.org/documents/LE-SA-v1.4-April-3-2024.pdf. You must agree in
order to register with the ACME server. Do you agree?
- - - - - - - - - - - - - - - - - - - - - - - - - - - - - - - - - - - - - - - -
(Y)es/(N)o: y <----- 利用規約を読んでください

- - - - - - - - - - - - - - - - - - - - - - - - - - - - - - - - - - - - - - - -
Would you be willing, once your first certificate is successfully issued, to
share your email address with the Electronic Frontier Foundation, a founding
partner of the Let's Encrypt project and the non-profit organization that
develops Certbot? We'd like to send you email about our work encrypting the web,
EFF news, campaigns, and ways to support digital freedom.
- - - - - - - - - - - - - - - - - - - - - - - - - - - - - - - - - - - - - - - -
(Y)es/(N)o: y  <--------- 電子フロンティア財団からEメールが届いてもいいか?
Account registered.
Requesting a certificate for www.hogehoge.com and kazuban.com
Requesting a certificate for www.hogehoge.com and kazuban.com

Successfully received certificate.
Certificate is saved at: /etc/letsencrypt/live/www.hogehoge.com/fullchain.pem
Key is saved at:         /etc/letsencrypt/live/www.hogehoge.com/privkey.pem
This certificate expires on 2024-09-12.
These files will be updated when the certificate renews.
Certbot has set up a scheduled task to automatically renew this certificate in the background.

- - - - - - - - - - - - - - - - - - - - - - - - - - - - - - - - - - - - - - - -
If you like Certbot, please consider supporting our work by:
 * Donating to ISRG / Let's Encrypt:   https://letsencrypt.org/donate
 * Donating to EFF:                    https://eff.org/donate-le
- - - - - - - - - - - - - - - - - - - - - - - - - - - - - - - - - - - - - - - -
Successfullyで取得できました。またコメントにより、
証明書ファイル:/etc/letsencrypt/live/www.hogehoge.com/fullchain.pem
鍵ファイル:/etc/letsencrypt/live/www.hogehoge.com/privkey.pem
が保存された事がわかります。
証明書の設定は「/etc/apache2/sites-available」の「default-ssl.conf」を編集し
「a2ensite default-ssl」で有効にします。
$ cd /etc/apache2/sites-available
$ sudo cp -p default-ssl.conf default-ssl.conf.org
$ sudo vi ./default-ssl.conf
<VirtualHost *:443>
        #ServerAdmin webmaster@localhost
        ServerAdmin root@hogehoge.com

        #DocumentRoot /var/www/html
        DocumentRoot /home/www/html
      ・
      ・
        #   A self-signed (snakeoil) certificate can be created by installing
        #   the ssl-cert package. See
        #   /usr/share/doc/apache2/README.Debian.gz for more info.
        #   If both key and certificate are stored in the same file, only the
        #   SSLCertificateFile directive is needed.
        #SSLCertificateFile      /etc/ssl/certs/ssl-cert-snakeoil.pem
        #SSLCertificateKeyFile   /etc/ssl/private/ssl-cert-snakeoil.key
        SSLCertificateFile  /etc/letsencrypt/live/www.hogehoge.com/fullchain.pem
        SSLCertificateKeyFile /etc/letsencrypt/live/www.hogehoge.com/privkey.pem
      ・
      ・
</VirtualHost>

$ sudo a2ensite default-ssl
PHPのインストール
インストール
$ sudo apt install php
$ sudo apt install php-fpm
$ php -v
PHP 8.3.6 (cli) (built: Apr 15 2024 19:21:47) (NTS)
Copyright (c) The PHP Group
Zend Engine v4.3.6, Copyright (c) Zend Technologies
with Zend OPcache v8.3.6, Copyright (c), by Zend TechnologiesWordPressサイトを参考に拡張モジュールをインストールします
パッケージ管理が違うので、すでに違うパッケージでインストール済みだったり
パッケージ名が見つからない場合がありましたが、とりあえず、このまま進みます
インストール済み
$ sudo apt install php-exif
$ sudo apt install php-fileinfo
$ sudo apt install php-opcache
$ sudo apt install php-iconv
$ sudo apt install php-ftp
$ sudo apt install php-sockets
$ sudo apt install php-shmop

インストール実行
$ sudo apt install php-curl
$ sudo apt install php-dom
$ sudo apt install php-mbstring
$ sudo apt install php-xml
$ sudo apt install php-igbinary
$ sudo apt install  php-intl
$ sudo apt install php-imagick
$ sudo apt install php-zip
$ sudo apt install php-redis
$ sudo apt install php-ssh2

パッケージが見つかりません
$ sudo apt install php-hash
$ sudo apt install php-openssl
$ sudo apt install php-pcre
$ sudo apt install php-filter
$ sudo apt install php-bc
$ sudo apt install php-image
fpm版のphpインストールと切り替え
ApcheのMPMは、「preforkMPM」「workerMPM」「eventMPM」の3種類あるようですが
Apache2.4系から導入されたのが「eventMPM」で、CPUとメモリの使用量が少ないようです。
「centos」ではデフォルトで「eventMPM」になっていますが、「Ubuntu」は「preforkMPM」がデフォルトのようなので、下記サイトを参考に「eventMPM」に切り替えたいと思います。
https://qiita.com/Nelson605/items/e3a8d10c1415dd0c5c0b
https://doudonn.com/saba/2491
$ sudo apt install php8.3-fpm
$ sudo a2enmod proxy_fcgi setenvif
$ sudo a2enconf php8.3-fpm
$ sudo a2dismod php8.3
$ sudo systemctl restart apache2

$ sudo a2dismod mpm_prefork
$ sudo a2enmod mpm_event
$ sudo systemctl restart apache2
$ sudo systemctl restart php8.3-fpm
php-fpm設定ファイルの変更
php-fpmの設定は「/etc/php/8.3/fpm/pool.d/www.conf」で行います。
php-fpmを動作させるユーザーとグループについては、Apache側での設定に合わせる必要があります。また、listenオーナーとlistenグループも、Apacheに合わせます。
バックアップ後編集していきます。
$ sudo cp -p www.conf www.conf.org
$ sudo vi /etc/php/8.3/fpm/pool.d/www.conf
  ・
  ・
;user = www-data
;group = www-data
user = apache
group = apache
  ・
;listen.owner = www-data
;listen.group = www-data
listen.owner = apache
listen.group = apache
  ・
  ・
HTTP/2を利用する。eventMPMモジュールとhttp2モジュールを有効
SSLサーバー証明書がとれたので、HTTP/2も利用したいと思います
有効なモジュールは「apachectl -M」で確認できます。
「mpm_event_module」は有効になっていましたが、「http2_module」はなっていなかったので有効にします。
「a2enmod http2」で有効にし、「apache2」を再起動後、「apachectl -M」で再確認します
$ sudo a2enmod http2
$ sudo  systemctl restart apache2

$ apachectl -M | grep http2
AH00558: apache2: Could not reliably determine the server's fully qualified domain name, using 127.0.1.1. Set the 'ServerName' directive globally to suppress this message
 http2_module (shared)
「http2」は有効になりましたが、エラーがでました。
「VirtualHost *:80」に設定したからいいと思っていましたが、メインにも設定した方がよさそうです
「/etc/apache2/apache2.conf」にも設定を追加しました
「apache2ctl configtest」で確認し、OKだったので、再起動するとエラーは消えました。
$ sudo vi /etc/apache2/apache2.conf
  ・
  ・
ServerName www.hogehoge.com
  ・
$ sudo apache2ctl configtest
Syntax OK
$ sudo  systemctl restart apache2
$ apachectl -M | grep http2
 http2_module (shared)
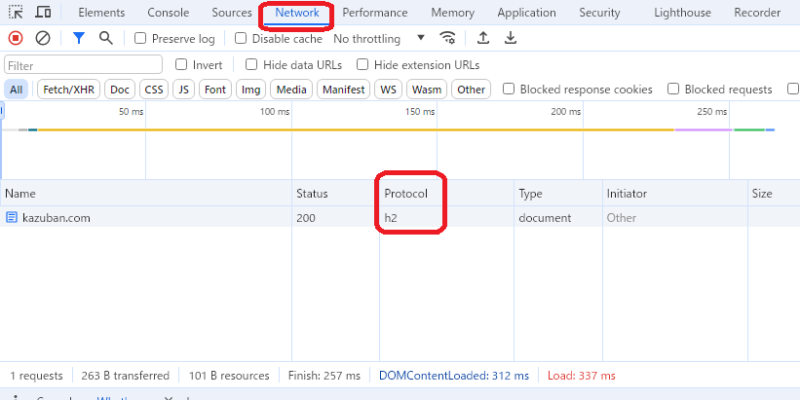
http2通信の確認
Google Chrome での確認方法を紹介します。
・アドレスバーにサイトのURLを入力し表示させる。
・「F12」キーを押す。
・「Ctrl」+「R」で再読み込み
・「Network」「Protocol」・「h2」で確認

php.iniの設定
このサイトでも「RockyLinux9」での設定を説明していますが、同様に設定したいと思います。
「ubuntu」での設定は、「/etc/php/8.3/fpm/php.ini」で行います。
念のためバックアップを取り、編集します。
$ sudo cp -p /etc/php/8.3/fpm/php.ini /etc/php/8.3/fpm/php.ini.org
$ sudo vi /etc/php/8.3/fpm/php.ini

expose_php = Off

;post_max_size = 8M
post_max_size = 128M

;upload_max_filesize = 2M
upload_max_filesize = 128M

;date.timezone =
date.timezone = "Asia/Tokyo"

;mbstring.language = Japanese
mbstring.language = Japanese

;mbstring.internal_encoding =
mbstring.internal_encoding = UTF-8

;mbstring.http_input =
mbstring.http_input = UTF-8

;mbstring.http_output =
mbstring.http_output = pass

;mbstring.encoding_translation = Off
mbstring.encoding_translation = On

;mbstring.detect_order = auto
mbstring.detect_order = auto

;mbstring.substitute_character = none
mbstring.substitute_character = none

$ sudo systemctl restart php8.3-fpm
$ sudo systemctl restart apache2
$ sudo systemctl is-enabled php8.3-fpm.service
enabled
Webブラウザで確認
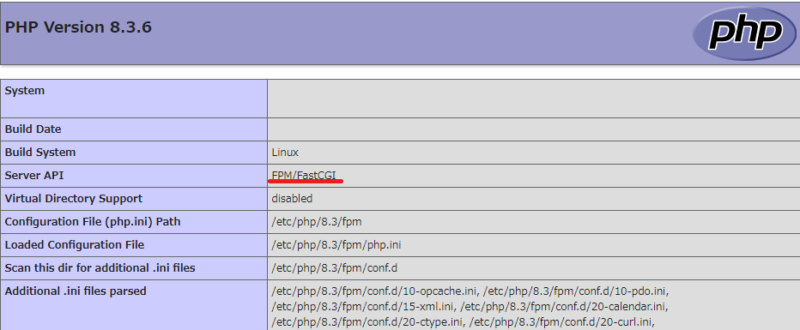
PHP設定の情報を出力させるコマンド「phpinfo()」を実行させるファイル「index.php」を作成します
$ cd /home/www/html
$ su
パスワード:
# echo '<?php phpinfo(); ?>' > index.php
「index.php」ファイルが作成されたら、Webブラウザのアドレスバーから確認できます。

「index.php」は、確認が終了したら、必ず削除しましょう。
MariaDBのインストールと設定
「ubuntu」での「MariaDB」パッケージを確認してみます。
$ apt list mariadb*
一覧表示... 完了
  ・
  ・
mariadb-server/noble-updates,noble-security 1:10.11.8-0ubuntu0.24.04.1 amd64
  ・
インストール
提供されているので、インストールします。
$ sudo apt update
$ sudo apt upgrade
$ sudo apt install mariadb-server
・

$ systemctl status mariadb
● mariadb.service - MariaDB 10.11.8 database server
     Loaded: loaded (/usr/lib/systemd/system/mariadb.service; enabled; preset: enabled)
     Active: active (running) since Sat 2024-06-22 08:54:42 JST; 7min ago
$ sudo systemctl is-enabled mariadb
enabled
自動的に起動と自動起動設定も完了していました。
基本的なセキュリティ設定
「mysql_secure_installation」で設定します。
# mysql_secure_installation
・
Enter current password for root (enter for none): <-- パスワード入力だけど
OK, successfully used password, moving on...           設定していない場合は「Enter」
・
・
Switch to unix_socket authentication [Y/n] n <--- 「unix_socket」認証に切り替えるか?
・
・
Change the root password? [Y/n] Y <---- MariaDBのrootユーザに変更するか
・
New password:               <---- パスワード入力
Re-enter new password:      <---- パスワード入力
Password updated successfully!
・
・
By default, a MariaDB installation has an anonymous user, allowing anyone
Remove anonymous users? [Y/n] Y     <----- ログインできる匿名ユーザーを削除するか?
 ... Success!
・
Disallow root login remotely? [Y/n] Y  <-- リモートからのrootログイン不許可?
 ... Success!
・
Remove test database and access to it? [Y/n] Y  <-- 「test」データベースの削除?
・
 ... Success!
・
Reload privilege tables now? [Y/n] Y  <---- 設定した特権テーブルを反映させるか?
 ... Success!
・
・
Thanks for using MariaDB!
文字コードの設定
文字コードを「utf8mb4」に設定します。
「CentOS」系では「/etc/my.cnf.d/mariadb-server.cnf」を編集しましたが、
「ubuntu」では、このファイルは見つかりません。
探してみると、「server」用と「client」用の2種類で設定するようです
・/etc/mysql/mariadb.conf.d/50-server.cnf
・/etc/mysql/mariadb.conf.d/50-client.cnf
いつものように、バックアップして編集しますが、「50-server.cnf」はデフォルトで「utf8mb4」に設定されていたのでそのまま使用し「50-client.cnf」のみ編集します。
$ cd /etc/mysql/mariadb.conf.d/
$ sudo cp -p 50-client.cnf 50-client.cnf.org
$ sudo vi ./50-client.cnf
  ・
  ・
[client-mariadb]
# ---- 2024/06/23 add
default-character-set = utf8mb4   <------- 追加
  ・
$ sudo systemctl restart mariadb
$ sudo systemctl status mariadb
確認してみます
$ mysql -u root -p
Enter password:       <------ root パスワード入力
Welcome to the MariaDB monitor.  Commands end with ; or \g.
Your MariaDB connection id is 31
Server version: 10.11.8-MariaDB-0ubuntu0.24.04.1 Ubuntu 24.04

Copyright (c) 2000, 2018, Oracle, MariaDB Corporation Ab and others.

Type 'help;' or '\h' for help. Type '\c' to clear the current input statement.

MariaDB [(none)]> show variables like "chara%";
+--------------------------+----------------------------+
| Variable_name            | Value                      |
+--------------------------+----------------------------+
| character_set_client     | utf8mb4                    |
| character_set_connection | utf8mb4                    |
| character_set_database   | utf8mb4                    |
| character_set_filesystem | binary                     |
| character_set_results    | utf8mb4                    |
| character_set_server     | utf8mb4                    |
| character_set_system     | utf8mb3                    |
| character_sets_dir       | /usr/share/mysql/charsets/ |
+--------------------------+----------------------------+
8 rows in set (0.004 sec)

MariaDB [(none)]> quit
Bye
「RockyLinux9」で設定した時は、システム再起動しないと反映されませんでしたが、今回はすぐに反映されていました。
ここまでで、「WordPress」を動作させる環境が整いました。
次回、「WordPress」を動作させます。
Ubuntu24.04LTSでWordPressを構築する記事一覧

SSL、PHP、MariaDB、Let’s Encrypt証明書でhttps化


